UTI PSA Coupon adding process New Portal or Add Balance in UTI PSA New Pan Portal - Do you also want to add balance or coupon in new UTI PSA portal then how can you do it. The old PSA portal will now be closed.
UTI has stopped giving coupons so you may also not be getting coupons. UTI has removed the coupon system and launched the wallet system. You have to apply for PAN card by adding your direct balance.
You can apply for PAN card in the new PSA portal in the same way as you fill the details on the old PSA portal, the same will have to be filled. Added some options like physical mode and digital mode, now you can generate PAN card without OTP and biometric through physical mode. Like old UTI formed at PSA site.
How to Add Balance in UTI PSA New Pan Portal
Similarly digital mode has also come. Which you have to apply PAN card with OTP or fingerprint, which gets your PAN card PDF in 2 hours. Where PAN card used to be made in 4-7 days, now PAN card comes in 1-3 hours on PAN card banker email id, PVC PAN card is delivered to home address after a few days. In this you do not have to upload the documents separately.
Today in this article only we are going to know that how you can add balance on new UTI PSA site to apply pan card.
Q's UTI has discontinued the coupon system. Now that the wallet system has come, how to add balance to the wallet. What is its process. What are you going to cover in the article?
However, in the new PSA portal, payment deposit option has been given for the retailer. But there is no use without admin, that's because he won't get your payment instant add.
Your balance will not be added until admin accepts your payment request, but we are telling you a site from where you can do Realtime balance add by yourself without admin interaction or without admin permission.
Its complete process is given below. By following which you can add balance by yourself. You have to do the same way as you add coupons.
UTI PSA Coupon or Balance adding process New Portal ?
How to Know Realtime or Instant Balance on New UTI PSA Portal online through UTI My PAN Centre. For this follow the steps given below –
Step 2:- UTI.Mypancenter.in - The site is made only for the services of Add or Transfer Balance, New PSA ID Registration or Activation and PSA User Password Reset without OTP etc. on New UTI PSA Portal. Which is monitored through admin. PAN card is not applicable from this site. Provides only Balance Add, ID Creation, Password Reset service. Retailer can be made for New UTI PSA Portal.
Step 3:- To login to the uti.mypancenter.in site, you will need to register an account here as well. For this we first register. your new account.
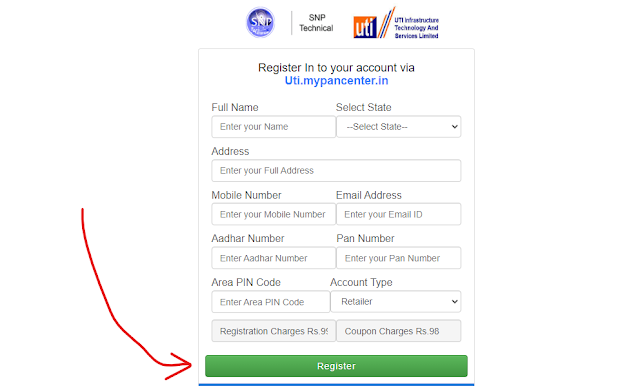
Step 4:- Then the registration form opens in front of you. To register here, you get the login ID of uti.mypancenter.in. Here you have to fill all the details. Select Account Type in Retailer. You have to pay one time registration fee of Rs.99. This Charges is the cost of the service available on this site. You have to pay coupon charge of Rs.98. If you add Rs 107 to the new UTI PSA site. 98. You have to pay Rs. You have to pay Rs 98, get a return of Rs 107 on the new PSA portal.
Step 5:- Enter Username. Enter password. Then click on the login button. Here the user and password are displayed at the time of registering an account on this site. If you don't know. You can log in without a username and password by clicking on the Gmail icon or the Google icon, as you don't have to enter a separate username and password. For this, you have to login with the registered Gmail ID.
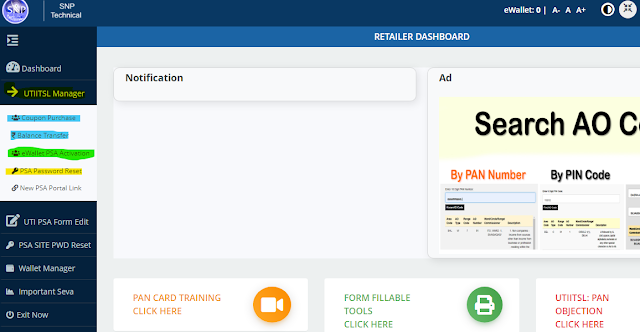
Step 6:- UTIITSL Manager > Coupon Purchase or Balance Transfer From this option you can add or transfer balance to the new UTI PSA portal. When you click on Coupon Purchase, you get the auto method. So that you can transfer balance without any error. When you click on Balance Transfer, you get the reference number. Which you have to submit your new UTI on PSA portal. After that you can transfer balance.
Step 7:- eWallet PSA Activation - If you do not have the login ID of PSA site then click on this option and create your new PSA ID. Your PSA Portal ID gets activated realtime. And you can login immediately.
Step 8:- PSA Password Reset - You can reset the password of the user of the URI PSA site. Whenever you forget the password of Username of UTI PSA site and you forget the password then you have to give OTP only then you can forget the password. But if you have created New PSA ID from this portal then you can reset password without OTP. Due to which your user password is banned, then you can enter your password and login by entering the user.
Step 9:- New PSA Portal Link - Clicking on this link will open the new UTI PSA site. From where you have to apply and improve your PAN card.
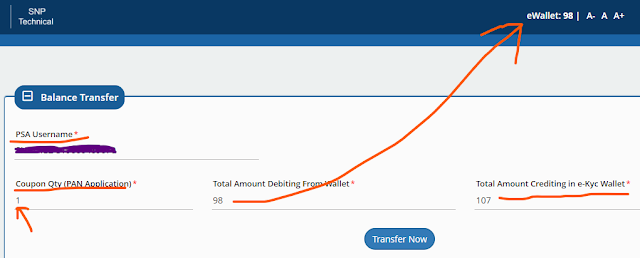
Step 10:- In "PSA Username"- you will have a Username displayed. Which will be of new UTI PSA site. If blank comes here then you can click on eWallet PSA Activation.
Step 11:- "Coupon Qty(PAN Application)" Here enter the number of how many Coupons or Tokens you want to add. Like we have typed 1 number.
Step 12:- "Total Amount Debiting From Wallet" - Whatever amount will be displayed here should be the amount available in the wallet of this portal. If balance is zero then click on Wallet Manager > QR Pay Collect and you can add balance on this uti.mypancenter.in.
Step 13:- "Total Amount Crediting in e-KYC Wallet" I will have 107 display if you make 1 type payment in coupon amount. The amount displayed here will be added to your new UTI PSA portal.
Step 14:- Enter the Coupon Quantity and click on the Transfer Now button. Your balance transfer success message will be displayed.
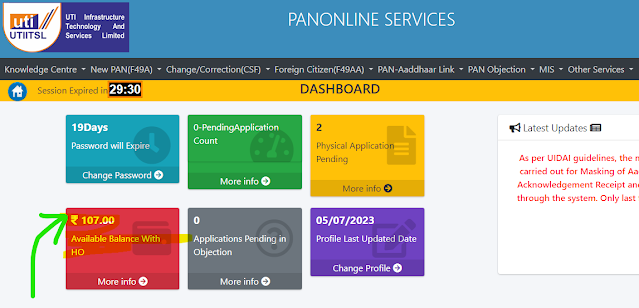
Step 15:- Then you have to login to New UTI PSA Portal. Your balance will be displayed in Your Available Balance With HO.
Step 16:- You can add balance like this. When you apply for a PAN card, Rs. 107 will be deducted in your PSA wallet. You can apply for PAN card from here.
Step 17:- Click on "Wallet Manager > QR Pay Collect" then you get to see something like this. Now choose the name of your pay app that you want to pay, then enter the amount, then click on the Latest QR View button.
Step 18:- "Wallet Manager > QR Pay Collect" On payment from here you will be further displayed a QR code, which has to be scanned from any application to make the payment. Your payment will be auto verified and payment will be added to the wallet.
Step 19:- "Wallet Manager > QR Pay With UTR" This also displays a QR code of yours. Like you enter the amount and proceed. So you have to pay. Earlier your payment was done, its UTR number has to be entered on the website, then click on verify button, your payment will be added.
Step 20:- "Wallet Manager > UPI QR Pay Collection" Here you have to enter the UPI or VPA ID which is @used, which is @ybl @icici @ibl @oksbi atc. ends with. Enter that and enter the amount. Then scan the QR code and make the payment. After the payment is done, the payment gets auto verified. gets displayed in your payment wallet, else you can enter the UTR number on the payment page and verify the payment manually. And your payment gets added realtime.
Step 21:- "Wallet Manager > Add by Paytm PG" From here also you can add to payment wallet, in which you just have to enter the amount. The gateway of Paytm opens in front of you, which displays the option of your debit card, upi or vpa id, qr code net banking, which you can add payment, after verifying the payment on payment success, in the payment wallet Is found.


0 Comments